Significant otters… plus a wolf and an extinct deer.

I couldn’t help myself, sorry ;P

I took a break from casting, to take care of several projects that were left behind, and waiting to be finished.

Let’s start with those otters.

This slideshow requires JavaScript.

I had loads of fun with this design. It’s also something of a experiment: that’s the first flush setting I’ve ever done, and it required a lot of sweat soldering, at which I’m pretty hopeless. But, to my surprise, the soldering went very well, and setting, whilst tricky, also wasn’t that difficult. I had to use watchmaker loupe, as those are 1mm CZs, and without it, I couldn’t really see what I was doing.

There are also otter earrings:

This slideshow requires JavaScript.

Those are the first stud earrings I’ve ever made, and I really like how they turned out. I’m thinking about making something in this style for myself 🙂 I had to make my own ear posts, solder them onto earrings, and make my own butterfly backs (you can see them in one of the photos). That was… a bit challenging, but also easier than I thought it would be.

While I was soldering the second ear posts, the weirdest thing ever happened. I managed to (be ready to read something really, really weird) pierce through copper with sterling silver wire. Takes a moment fro that to sink in, doesn’t it? I have absolutely no idea how I did this. I guess it will forever remain a mystery.

And now for the wolf… Remember the wolf cuff from my last post? It’s finished:

This slideshow requires JavaScript.

I’m somewhat surprised I managed to take decent photos on first try. This never happens to me. I’m really happy with this one. The etching is nice and deep, the wolf etched pretty much the way I wanted it to, and I really can’t find much to complain about. It’s 15cm (5.9in)long, 2.5cm(~1in) wide, and with 2.5cm opening.

And as for the extinct deer in post title?

This slideshow requires JavaScript.

Let my introduce you to Megaloceros giganteus, the famous giant Ice Age deer. It is one of the biggest cervids to ever live. It could be more than 2 meters tall at the shoulders, weight more than 700kg, and it had the largest antlers of any cervid ever. Its antlers were up to 3.65m from tip to tip, and could weight as much as 40kg. That means that those antlers could weight almost as much as I do. I’m maybe 5kg heavier. I’m pretty small, but that still puts it into perspective, doesn’t it?

And now M.giganteus is on that cuff, because it just had to be 😉 I wanted to make a cuff with it for a long time, but other thing kept getting in the way, but finally, here it is.

So that’s it for now, I hope you have a great week!

Till the next time!

Delft clay casting so far

So, in the last post I said that I purchased supplies and tool for delft clay casting. Apparently, it’s not as easy as it looks.

I made my wax models, got all excited when my clay arrived, and got to casting… or at least tried to. I knew melting copper isn’t easy, but I didn’t expect it to be that difficult!

I had very hard time bringing it anywhere near the melting point. Copper melts at 1084.62 °C, ​1984.32 °F. My bigger torch is capable of reaching 1800°C. I thought it should be plenty hot for melting that metal. Well, I managed to get it to semi-liquid state, one got it all nice and fluid, but couldn’t keep it molten long enough to pour it into the mould. But got excited ( I melted it, right?) and then… my excitement quickly vanished when I saw this:

This slideshow requires JavaScript.

I was worried the torch was damaged, but after it cooled down it turned out that only that part of plastic casing got deformed, and the damage didn’t extend to any important parts. I had to get a new torch. I did just that.

The monster

The monster

The flame that thing produces is huge. I thought it would melt the copper, but… I don’t know what I was doing wrong, but I would bring copper close to melting point, and then it would cool down for some reason, even though I kept the flame in exactly the same position it was before. I got pretty angry, searched the net, and found out there’s Japanese alloy of copper and silver called shibuichi. Ratios of metals vary in those alloys: it can be very close to sterling, but there are types with 90% copper 10% silver, or even more copper, there are types where there’s 1% of gold present, and so on. I had a little bit of silver, and after reading that this alloy melts in lower temp than copper and silver I decided to make 70%copper 30% silver mix. I knew I could melt silver without bigger problems, so that seemed like a good solution.

It worked. After a week of trying to cast something, I finally had an alloy that I could melt and keep molten long enough to pour it into the mould. I didn’t have enough to really cast anything in its entirety, but I had something to practice with.

I managed to cast this:

Somewhat succesfull cast

Somewhat succesfull cast

Sorry for the bad picture. It was partial success, but there was a lot of gas porosity present. But it was encouraging, so I ordered 20g of pure silver casting grain to make more of shibuichi.

And this way I spent another whole week casting. I made a bit more of the alloy, added it to my existing batch, and went on casting the piece above. I had the right amount to cast whole of it, but the porosity was bad. And I was using flux, which is supposed to help with it.

So I had to search through the web again. I read somewhere that if there is a little bit of solder on the metal you want to cast present, it will behave terribly in casting. For my first batch of shibuichi I melted some art clay silver pieces I gave up on. I did my best to clean those, but there might have been some solder left.

I decided to make fresh batch, and see if it will perform better. This was the result:

Almost successful cast

Almost successful cast

Again, sorry for the photo. It’s so close to being a good cast, I don’t really know if I’m happy with it or frustrated.

There’s way less porosity than on the pieces I cast with the previous batch ( I don’t have pictures, you just have to believe me). But of course there just had to be this great big bubble smack right between the wolf’s ears. I’m going to use more flux next time I cast this. Maybe that will help.

So that’s my experiences with casting so far. I really hope I’ll get better results next week.

Apart from learning how to cast, I also made another cuff:

Running wolf cuff in progress

Running wolf cuff in progress

I just need to clean the etching up a little bit, and oxidise it. I had another one designed, I just have to make it.

I’m also very close to finishing those unfortunate lockets. I just still don’t know what to do about that little slit on the raven one. That’s the major reason they’re taking so long.

So that’s it for now.

Till the next time! (hopefully with some nice casting and those dreadful lockets!)

Cast ring in progress

This will be a very quick post. Lately I seem to have time for posting anything insanely late at night. Honestly, it’s almost 4 am here. Though this probably makes it insanely early in the morning.

I have a lot of scrap copper, and decided to order delft clay casting kit, wax, ring carving thingy, and all the stuff required for casting anything (well, apart from casting shadows. You don’t need equipment for that).  I was really surprised when wax, ring thingy (I think it has some very unimaginative name, like wax ring stick.), crucible tongs, zirconias, and ball burrs where delivered today. I order the lot Thursday evening. Zirconias and burrs, by the way, are for flush-setting. I wanted to try that for a long time, and finally designed a ring with flush-set zirconias. If I like it, I’ll at some point get proper gemstones for that.

New toys!

New toys!

Ta-dah! I freely admit to suffering from a serious case of tool euphoria. I’ve been told my mum astonished her coworkers when she told them that “her daughter would love a new hammer for Christmas. Not just any hammer, but still, a hammer”. If I remember correctly, someone asked her if she had present for me, and if yes then what it was, because the person asking had problems finding something for their daughter.

Cute little teeny-tiny 1mm ball burrs.

Cute little teeny-tiny 1mm ball burrs.

Here, have a close up on those cute little ball burrs. I’m still waiting for the stone setting burr.

Of course, being me, I just had to get my hand on the wax right after receiving it. I prepared a wax model of a ring. I made it, so it’s a wolf ring. Because what else could’ve been on my first ever casting project, if not a wolf? The wolf is sleeping, and above him there will be three flush-set clear cubic zirconias. If I’m any good with casting, I’m going to add made-to-order rings to my etsy store, including this design.

This slideshow requires JavaScript.

Apparently, wax carving is a very messy business. After I’ve finished this, I had wax dust everywhere. On my clothes, in my hair, all over my work table… But it’s fun! The ring band is in my size (as for my left-hand index finger), being 5.5 in US sizes (I think, there are so many conversion tables the mind boggles), 16mm in diameter. And by the way, that lighter spot is not a hole, dimple or anything like that: it’s an air bubble inside the wax. It’s there because I broke the blank when I was cutting it out of bigger slice, and heated it up to glue it back together. It merged together beautifully, without any visible lines or cracks, with only this one bubble left. It doesn’t affect surface in any way.

I also mentioned lockets in previous posts…

This slideshow requires JavaScript.

Here they are. They’ve progressed somewhat since I took those pictures, but are still not finished. I’m beginning to think there is some curse associated with them. Something goes wrong all the time. I thought the raven one was finished, so I wanted to oxidise it. First, the oxide just wouldn’t take (if that’s the proper way to say it). It just wouldn’t stay on the metal. I was oxidising other things along it, and none of the others exhibited problems like that. It was thoroughly cleaned, too. Finally it seemed as if the oxide actually stayed on the copper. But once I started to polish it… you can see for yourselves in the pictures: it started to come off again. And to make matters worse: I noticed a little, tiny hole in one of the joints. Arrrrgh!!!! I swear it wasn’t there before I put it into liver of sulphur. Then I started work on the wolf one… and at first I thought it was going great… and then it all went downhill. Ugh. I hope I’ll finish them though.  I hoped to have them done by this weekend, but, alas. No such luck!

So there you have it.

Till the next time!

What’s been going on

It’s been a while since the last time I was here. I just never seem to have enough time!

So, since the last time I’ve been here, I made hinged bracelet, and I had tones of fun making it! I will definitely make another one some time soon. Apparently, I can make big hinges. It’s the small ones that drive me mad! I also made silver pendant, and silver earrings, I’m close to finishing two lockets (but I don’t have pictures uploaded to my computer, so I will post them tomorrow probably), and I also almost finished another painting, one I intend to be a beginning of a series I’m calling, for now, The Rise of Mammals. This may change yet, bu we’ll see.

So without further ado, it’s pictures time!

This slideshow requires JavaScript.

So this is the bracelet. As I mentioned, I had loads of fun making it! It also took forever: at least 10h, I stopped counting at one point 😉 This also made pricing it difficult, and I’m still not sure if it’s not too expensive, but I already took the fact that hinges are still not my forte into account, and subtracted a bit of time I spent on some things, especially when I made mistakes, deciding it would go faster, or easier if I was more familiar with the process. Oh, well. Pricing is the most uncomfortable part of selling what you make! Well, at least for me. This bracelet is also surprisingly difficult to photograph: I’m not very happy with those pictures, it looks better in person. The stone is carnelian.

Moving on…

This slideshow requires JavaScript.

This is solid, fine silver pendant I made using art clay silver (apart from bezel, I soldered it onto a finished piece). I like working with art clay, it’s fun:) To make the wolf’s head, I first made a model out of polymer clay, baked it, made a mould (using thermal plastic, another fun material to work with), and moulded the final silver piece. The rest of the pendant I made by hand, without moulds of any sort. After firing, I had to file a bit of sides down, because it shrunk more than I anticipated, and the bezel wouldn’t fit. It’s oxidised, and darker than on those pictures. The first one is the best in terms of colour. And the stone is garnet.

This slideshow requires JavaScript.

Another pictures to retake… this wasn’t a good photo-shoot session. Same as pendant, solid silver earrings, made using art clay. I didn’t use any moulds making these, and I really like the outcome:) They’re also oxidised, and the stones are also garnets. I didn’t added them to my shop, because I just don’t think the photos are good enough.

And for the picture I’m working on:

Echinerpeton intermedium

Echinerpeton intermedium

Meet Echinerpeton intermedium, one of, if not the earliest known synapsid. It’s sleeping here, on some Walchia leaves. Actually, since saving that WIP, I removed those branches, deciding I made them too thick. The new version have base colours laid down, basic shadows in part of the branches, but still requires quite a bit of work. Echinerpeton itself is pretty much finished, apart from some tweaks to be made. I’m also not sure if I’ll leave the background as it is. I plan on making a series of 12 paintings like this, each next one featuring a bit younger synapsid, and each next animal more awakened, until the last painting featuring one of the earliest known mammals, fully awakened and alert. And then I plan to make them all into calendar on my redbubble 😀 I like the idea, but it will be a gargantuan task, due to lack of source materials on synapsids available online 😦 It’s a sorry state of affairs. I envy dinosaur people sometimes, they have better access to references. Oh, I just remembered that I didn’t share my Inostrancevia here!

So here it is:

Inostrancevia laexandri

Inostrancevia laexandri

That one at least is somewhat represented online, being quite famous and all. I gave it whiskers, even though it’s purely speculative. The fur had to start out somehow, and one of theories says it started as sensory devices, such as whiskers. Not sure how supported that one is, but I like the thought of whiskered Inostrancevias 🙂

That’s all for now, till the next time!

An update (finally)

I’ve been quite busy lately, and didn’t really have the time for posting. I have quite a bit of new stuff, and I have no idea how to fit it all in one post 😛

For example, I did made pieces featuring an extinct creature, just as I planned. Said creature is Homotherium, a saber-toothed cat from Pliocene and Pleistocene, that lived in both Americas (though the evidence from South America is scant… but it’s there), Europe, and Africa. It’s sometimes referred to as scimitar-toothed cat, because of the shape and size of its canines. the pieces in question are: a necklace, and a pair of earrings. Both etched.

This slideshow requires JavaScript.

It was fun to make those… I wanted to retain as much of the correct proportions as I could, so I took a picture of a Homotherium latidens skull, drew a life-restoration of a head with it as a base, and then scaled the image down so it would fit on the pendant, and then scaled it even more, so it would fit on the earrings. I’m pretty happy with how those turned out.

I also decided to use my saw a bit more than usual, and actually managed to cut those earrings in one go each! As for my sawing skills, that’s pretty awesome. Apparently, we started to cooperate, my saw and I.

Moving on… I made two more pairs of earrings, one with a flying raven, and one with wolves. They’re also etched.

This slideshow requires JavaScript.

I’m really, really happy with the raven ones, and not sure about the wolves. I’m trying to decide if I want to put those in my shop or not. Maybe I will even reach something akin to decision in foreseeable future…

I also wanted to make a cuff for quite some time now, but first the etching on my first attempt didn’t turn out the way I wanted it, then I had other things to do, then I forgot all about it… and finally last week I made it! And not just one, but three. Though to be honest, i could make another one, as I’m not convinced about etching on one of them. But this would mean making a fourth attempt on one design, and everything just cringes inside of me on that thought.

This slideshow requires JavaScript.

And also, those three cuffs are an evidence that etching, at least in salt-water process, is somewhat unpredictable. All of them etched for three hours, yet all etched differently. Not only that, the etching differs within one cuff, from left to right. I will show you what I mean:

This slideshow requires JavaScript.

I have no idea what can be responsible for effects like these.

So those are the pieces I finished, but I’m also working on some 🙂

For example, remember the locket? Well, since then I managed to throw away one attempt, almost finish the second, and just then realise one wall got soldered on skewed, and now I’m almost finished with the third. And, the way things are looking right now, I think I will actually complete this one:) I really like it so far. I also entirely hanged the design, for a more difficult one- but that’s just me. Here it is:

This slideshow requires JavaScript.

I’m only a chain, a finished hinge and a bail away from finishing it 🙂 The chain to connect the locket to a pin that will act as a part of a closing mechanism ( I hope you know what I mean). At first I wanted to make it myself, but after several minutes of trying I understood that I will go mad way before I ever finish it, so I will just buy it. And also, I spent 4 hours on a hinge alone. I just hope that setting the hinge pin in place will go a lot easier than soldering the hinge knuckles on… that was one irritating experience!

But, all in all, I’m very pleased with how it looks right now 🙂

And the other piece I’m working on will be a mixed media pendant. I got the idea after reading something, where someone was complaining about how many interests they have, how they don’t have the time for all of them, and someone wrote about them trying mixed media jewellery. And I had to do just that! And I’m also very happy with what I came up with:)

This slideshow requires JavaScript.

I’m especially pleased with the frame: I knew it will be wrinkled and all that, and I had no idea how it will look after I fold it. But I really, really like the effect I achieved. I definitely plan on making several more of those. However, as happy as I am with it, I have to mention a slight problem. After I poured the resin in the copper frame, I made sure there were no air bubbles. I passed the torch over the resin to burst any of them. Several times. And there were no bubbles. And yet, when I checked on that piece when the resin was almost set, I noticed two huge bubbles in the right-hand lower part. And they popped. Which leaved two dimples in the  surface. Strangely enough, they don’t bother me that much. I will add another layer of resin; the dimples will still be visible, but the paper won’t be exposed.

I also made a mistake here: I got overexcited about the painting and how nice it looked with that copper frame, and poured the resin over. And after it was set it occurred to me, that I can’t add a bail I designed, because I can’t solder anything anywhere near the resin! I will have to figure something else out.

I’ve made a ring as well, bu I don’t have any decent pictures, and it also is not finished.

I actually got tired from writing this post, so I guess this is it for now 😉

Have a great weekend!

Oh, and praise the wordpress for their lovely galleries! Wish blogger had those….

The two cuffs, Homotherium pieces, and raven earrings are available in my etsy shop.

New toys and a Homotherium

So… It’s been a while. I managed to catch the first flu in ages, and it turned me into some kind of particularly floppy amoeba, and I was able only to lie in bed and feel sorry for myself for quite some time. Ugh. I forgot how awful that feels. But I finally managed to get myself together, and started work on a new, experimental piece. Experimental, because I’ve never made a locket before. The fact that I will have to make a hinge pretty much terrifies me 😉 That locket, however, is the reason why I got delightful new toys: my little butane blowtorch proved to small, and couldn’t get the piece hot enough, which meant that solder wouldn’t flow, no matter what. I had to buy bigger torch. And I did. And it’s a real monster, but I already love it 🙂

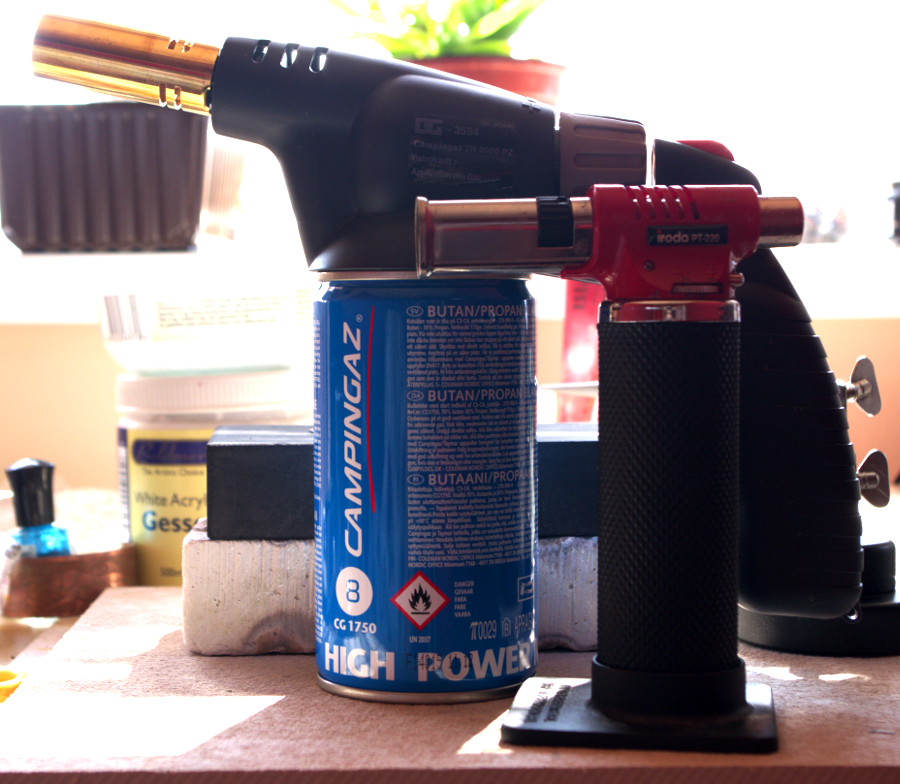
A monster and a blowtorch

Here you have it: the new, propane/butane torch, with my little, trusty iroda for comparison

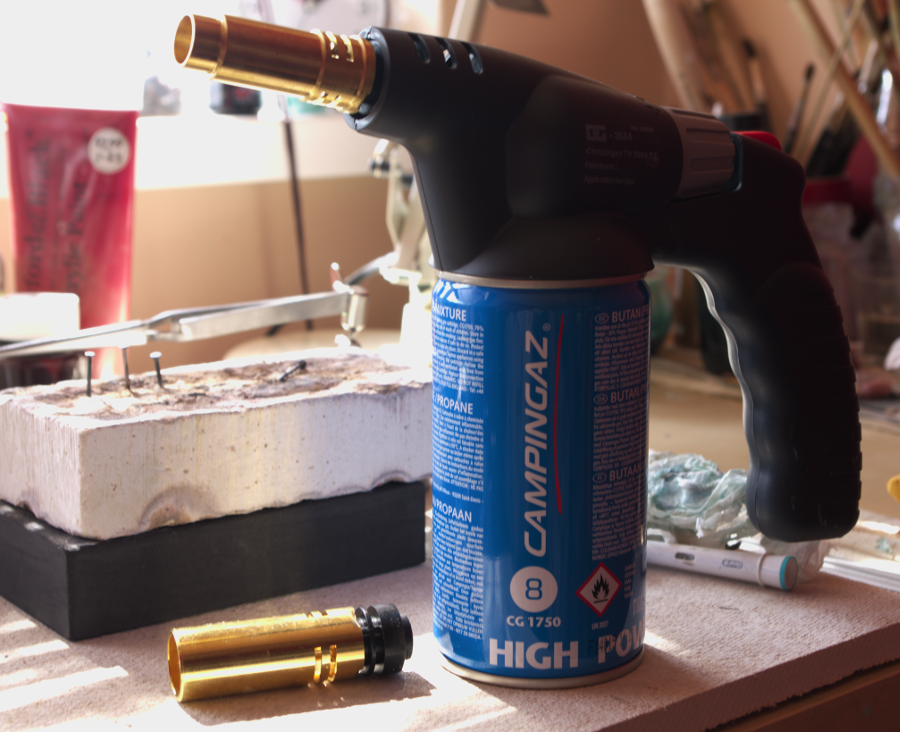
See what I mean by “monster”? It’s actually not the model I intended to buy at first ( I had one other option available), but this one has piezo ignition. There is gas control valve as well, though no way to control air flow, nor a kill switch. However, with the size of the flame that beast produces, and how hot that flame is, the air control doesn’t really matter that much, it gets the job done in seconds. I would prefer if it had a kill switch, but that’s my personal preference, the torch is easy to use and works like a charm. It runs, as I mentioned in caption, on propane/butane mix, and reaches 1750 C. The other model I could buy reaches 1800, but it was heavier, and, as I already stated, without automatic ignition system. I don’t think that this 50 degrees makes any big difference, 1750 is plenty hot for my uses. As I mentioned, the torch produces big (not to say: huge) flame with the burner it came with. Good news is, there are replacement burners available, in several different styles, including one called x1650 extra fine burner, and, according to the producer, that one is suited to jewellery and model making. Bad news is, that particular burner proved to be hard to find, practically unavailable in the UK. I had to order one from Germany, pay ridiculous postage price, in effect paying for burner alone as much as for the torch itself(which came supplied with the default burner you can see on the picture above, and with one gas can). However, it was delivered yesterday, and I’m really glad I bought it: the smaller burner can make really big flame, but, contrary to the default one, it can also produce a really small one, and everything in between. And that’s really helpful, because the smallest flame the default tip can make is still so big it’s difficult to even see what’s going on on the soldered piece. All in all, it was totally worth the price and ordering from Germany.
Blowtorch. And burners. And mess.

The fine flame burner is on the torch, the default is laying next to it. Not much difference on the outside, but a big one performance-wise. Also, all the paints, polishes, and what-not are not present on the table when I’m actually soldering. Just so you know 😉

Naturally, after I brought that beast home, I just had to see how it works. I soldered one wall of the locket on… and decided that my magnesia block is no match for it (that was before I bought the fine burner). I rummaged through the internets, found out that charcoal block can, apparently, withstand up to 3000 C, and decided I need one. I also bought a soldering board to rest the block on, and to protect my table from the heat the monster’s flame is giving off- it’s significantly more then what my butane torch is capable off, so I found my old set up not satisfactory.  When I’m using the big torch, I’m using magnesia block to elevate the charcoal one, or as soldering surface, but only when I need to use pins to hold or prop something in place. When there is no need for pins, I’m using charcoal with the third hand(if needed) I bought together with it and the soldering board.

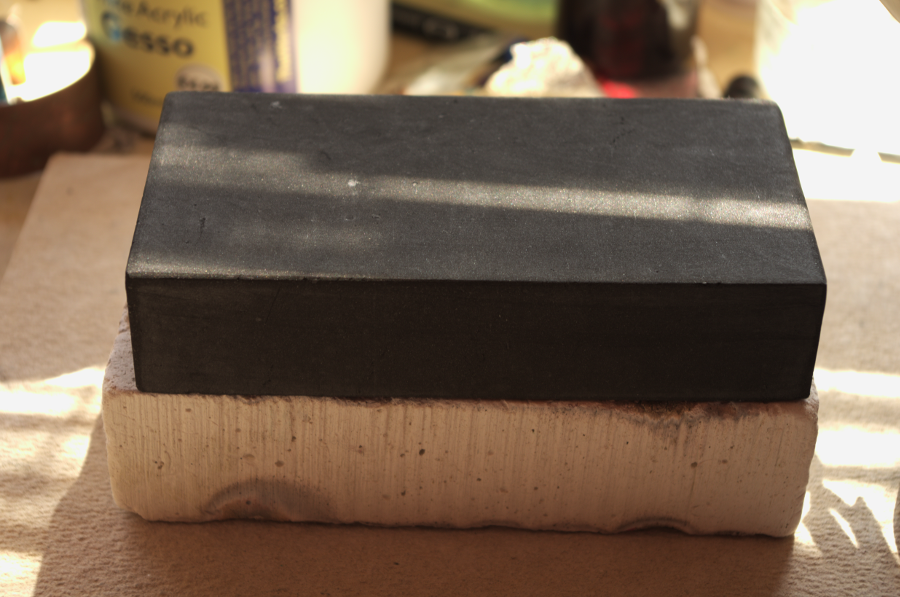
Charcoal block, magnesia block, soldering board. And a mess, of course.

New, on this picture yet unused, shiny charcoal block, on top of my old, much used and abused, but loved, magnesia block. You can also see the soldering board.

I must say, I was a bit surprised by the weight of the charcoal block. I’m used to magnesia block, which is really lightweight. Also, the charcoal retains heat much longer, and.. how should I put it… retains more heat than magnesia. Logically it’s pretty obvious, but I was a bit surprised after I touched the side of the charcoal block after the first use. The sides and the bottom of magnesia block are almost never hot after soldering, only the surface I was soldering on, and that cools pretty quickly. The charcoal block has very different properties, but I rather like it.

Soldering surfaces! Third hand! Tweezers! Beginning of a locket! Perspective! Fun stuff all around!

The charcoal block, magnesia block, soldering board, third hand with tweezers, beginning of a locket, and a really weird perspective.

As long as I’m writing about surprises: the weight of the soldering board came as one as well. I blame the magnesia block for all this. It just has to be so light, and confuse people, doesn’t it?

I’ve seen on several blogs, read in several interviews, that some, even rather accomplished, people really don’t like the third hands, and can’t work with them. I never used one before I ordered this one, so I took it as a bit of a gamble. I was a little afraid I will buy a tool I won’t use, but happily, that was not the case. It works well for me, and is quite a bit of help- I’m especially happy I don’t find it irritating, or difficult to work with, as otherwise I don’t know how would I soldered the bail I designed for the locket, in the place I designed it to be, without something like the third hand ( I just love that name, by the way).

In case you would like to see the locket in progress, here you go:

This slideshow requires JavaScript.

Sorry for the bad pictures. I took those photos the day before yesterday, and today it already has all four walls, I even soldered one  hinge knuckle. I’m not sure if it’s in the right place, though… Tomorrow will be the day of truth, so to speak. Also, what you can see here is the back of the locket (obviously), I’m planning a red abalone cabochon on the front. I could have it finished today, but my pickling solution stopped working, and I have nothing to make a new one from, so it has to wait until tomorrow. Which means I have a full evening and approximately half a day before making the dreaded hinge!

That’s… pretty much it. Oh, I may just add that I had this idea to somewhat link all my passions in my jewellery designs – by which I mean biology, evolution, palaeontology, and art. I do what you can, if you’re being generous, call paleoart , I adore our beautiful world, and find the life’s history absolutely fascinating, I love all the diverse lifeforms, extant or extinct, and I was thinking about making jewellery featuring not only animals that are alive today, but also those that lived a long time ago. Knowing myself, those would be mostly synapsids: land living animals that led to, and contain within their ranks, mammals. You know, things like Inostrancevia, Dimetrodon, saber-toothed cats, and so on. I’m still not sure if I will do this, but that idea gets me all exited 🙂

Here, have a Homotherium latidens as a closing illustration:

Homotherium latidens

Homotherium latidens, known as scimitar cat. Homotherium is a genus of a saber-toothed cat that lived during Pliocene and Pleistocene, ranging from Africa, Eurasia, and Americas. Latidens is Eurasian species.

Oh, I just remembered. I sold a pair of earrings to… Australia, of all places. That’s a long way from me. And here I thought orders form USA were going far, far away from home…

Have a great weekend!

The Wild Song is growing

…slowly ;). I continue to have fun with salt water etching. It may well become my favourite technique. However, I still haven’t found the perfect medium to act as resist. Acrylic paint is pretty good (be it regular acrylic or enamel), but there is a slight problem with it. At least for me, I obviously can’t speak for everyone using this technique. The problem is that, as I learnt the hard way, that while the saline solution won’t dissolve the paint (as it seems to be doing with, for example, markers), if you keep your project for, say, 2 hours continuously etching, the paint will peel off. Generally, more than an hour increases the risk of this happening. It happened to me no matter which type of acrylic paint I was using. I also tried india ink, and it works basically the same way the acrylic paint does: performs admirably up to an hour, but anything longer than that, and it may peel off. I heard about using nail polish, but I haven’t tried this one yet.

Anyway, I finished, photographed, and recently uploaded another three necklaces and a pair of earrings. And then I was too lazy to write a post ;P

So here they are:

Raven Song necklace to match the earrings I showed last time:

This slideshow requires JavaScript.

Another pieces of the Raven Song line. I decided to call those designs Raven Song: flight.

Necklace:

This slideshow requires JavaScript.

And it was when I was working on that necklace (and earrings, they were etching simultaneously ) that I learnt that I can’t leave the project for prolonged amounts of time during etching. Unfortunately, until I find the perfect resist (if I find it), it would seem that stopping every hour to strip the paint, and apply new coat is the way to go. Or it’s just an example of bad luck: if I check on the project every so often, the paint usually holds… if I’m not checking on it, however… it merrily peels of. But for now, I’m not taking chances, and do the paint-etch-strip-paint again-repeat routine.

Here are Raven Song: flight earrings:

This slideshow requires JavaScript.

I think I spent some 7-8h working on etching on those earrings and necklace, because of the peeling paint. It’s irritating. I always clean the metal before painting. I treat every piece exactly the same. And yet, sometimes the paint will hold, and sometimes not. Oh, well, maybe nail polish will work better.

And the final new piece is of the Wolf Song line. I’m calling it Wolf Song: the night. I haven’t made earrings yet… because I don’t like sawing out round blanks ;P I have to get myself a disc cutter.

This slideshow requires JavaScript.

I will, sadly, have to retake some of those pictures. You would think, that after taking so many jewellery photos, I would finally grasp how to light the item properly. I wonder if this will ever happen? Anyway, back to that necklace. The etching is shallower on this one, because, apparently, the water became overly saturated with copper, and it was going really slow. I etched the pendant for 4 or 5h, and the cut (for the lack of better word) is still shallow. The image, though, is visible enough. Polishing was a bit tricky, but it could be done.

So those are my newest items, and I’m working on another set right now, so I should have something new to show in about a week (if everything goes according to plan) or so.

I also bought triblet and sizing rings, and am experimenting with ring-making. For example, I discovered that prong setting is not at all as straightforward as it looks like, and can give maker a major head ache. Or maybe it’s just my mad soldering skillz… When I get to the point where I know what I’m doing, I will try to figure out the best strategy of selling rings… I will probably make them adjustable, making fixed sizes if I happen to have a custom order (in a very, very distant future…).

Also, in tool news: I got something that is called alligator finger protection tape, and it’s awesome. It’s actually used as bandage in medical industry. I tend to scratch, cut, and generally hurt myself, especially when filing something. I got curious about that tape, and decided to try it out, and can now gladly say that it works! It’s also, for me, way more comfortable than protective gloves: for one thing, I have small hands, so usually even “small” gloves are a bit too big for me, and that’s not comfortable when you try to handle small objects, and second: the tape is thin, so it doesn’t hinder the sense of touch that much ( it still does, but less than gloves). I tried it while filing, sanding, sawing, and making chains (my fingers get really sore after working with pliers for several hours), and it works in all those instances. I ran file along my fingers a few times (not on purpose) and the tape didn’t tear, nor did I feel any discomfort. The same with sawing. As for sore fingers from pliers: it helped quite a bit, but they were still a little sore (but nowhere near the extent they get without any protection), so next time I will put some kind of padding ( cotton wool or a piece of fabric) between fingers and tape, and I’m sure it will eliminate any discomfort. I’m rather happy with how that tape performs.

This slideshow requires JavaScript.

I couldn’t resist showing off my new toys 😉

Till the next time!

P.S. I love how easy it’s to make a gallery in wordpress… I tried this today in blogger. This lead me to abandoning that idea seconds after finding out that this involves html edition, and going the easy way of composite pictures… No fancy slideshows if you don’t feel like writing codes for blogger users. Ridiculous, I say.

Salt water etching results

I recently discovered salt water etching technique and just had to have a go at it. I always liked the look of etched jewellery, but never got around to buying etching solution, nor felt really comfortable with using a rather strong acid – I worked with strong, and even dangerous chemicals before, but always in well equipped lab, not at home – so this seemed perfect for me. I must say that it may quickly become my favourite technique 🙂 I also decided to really try to, how should I put it, develop a consistent, characteristic style, and, in time, make a major overhaul of my store. Finding out just what, exactly, characterises me was a bit difficult, but I finally feel like I’m heading in the right direction. Focusing on figuring it all out was probably one of the best decisions I made regarding my jewellery, because designing became much, much easier, and I’m a lot more happy with the results, and I can… identify with what I made more than before.

The first pieces I made using salt water etching are the first pieces of the new collection I’m developing right now. I actually decided to make two separate lines, but one of them exist still only on paper – but it will be more or less stylistically similar to the moon tree pendant I showed last time, and will be called Axis Mundi (world axis in Latin ). The line I already started to make is called The Wild Song.

The finished pieces are the core pieces of two of, for now, three major components of the wild song line : wolf song and raven song ( I’m planning also wind song designs, but I’m quite sure I will add others in time). All are made of copper, which I oxidised and polished after etching.

The first is the wolf song necklace:

This slideshow requires JavaScript.

All handmade, of course. The chain took 5 h to make! But I love the look of it 🙂 As you can also see, I completely change my picture set-up. And I must say, that I absolutely adore how they look now 😀 I’m definitely sticking with the black background and the… glass cutting board to provide reflective surface – I would prefer if it wasn’t textured, but it sometimes gives interesting results: like on that second photo. I also decided to blur background a bit to make the jewellery pop out more.

There are matching earrings for that necklace:

This slideshow requires JavaScript.

And here I learned something new: to consider how the design will affect the bahaviour of the finished piece. I didn’t really think about the fact, that this shape will make the earring unbalanced. But I actually quite like how they hang, so I didn’t redesign them. But from now on I will think about physics when designing something 😉

And the last finished etched items are the raven song earrings:

This slideshow requires JavaScript.

There will be matching necklace for them, and I already etched the pendant, but I still need to make, and add, bail and chain for it.

I also need to get better 50-200 lens, since this one has problems with focus, but that will have to wait. Unfortunately.

All are available in my etsy store, and there will be more pieces coming soon 🙂

If you would like to try salt water etching, I found that technique on youtube channel called online jewelry academy. They have two videos: one using 9V battery as a source of electricity ( because this technique is a reversal of electroplating, and needs one) and the other using modified 9V adapter. I’m actually using phone charger for it. It has lower output than recommended 9V, and I wonder if the etching would go a bit faster with a bit stronger current? Because, as much fun as it is, to get to depth I like, I have to keep it going for 3 h. I could write here about the technique, but I tend to ramble in my explanation, so if you are intrested in that method, you should check those videos out: here’s the first, and here’s the second one.

Have a great day!

Moon tree pendant

I’ve finally managed to shake off the layers of laziness that Christmas and New Year break left me with, and made my first pendant with a bezel setting! I like how it turned out, even though I’ve spent close to 6 hours working on that bezel: measuring, soldering, deciding the metal is too thick, cutting open at the seam, hammering, re-measuring, re-soldering, and finally – filing to the right height – it all took ages. And resulted in me not being able to move my head overly much today – my neck muscles are sooo sore! That will teach me to bend my head for prolonged lengths of time while working on something!

And here it is, the culprit behind my limited mobility:

Moon tree pendant

It has tendency to do weird things while photographed… like leaning to the side

I shaped the pendant using art clay silver, and after drying and firing, soldered on a bezel setting for the stone. Also, I don’t have bezel-setting-dedicated tools, so my hands… hurt. A lot. But the stone is locked in place – there is a hole drilled in the back of the pendant, and I stuck wire in it to check if the stone is secured, so I’m certain it won’t fall out – I somehow can’t imagine its hypothetical new owner sticking needles or other thin objects into said hole, trying to remove the stone… and even if someone tried that – sorry, no luck. The stone is not going anywhere, I checked 😉

Moon tree pendant

… really leaning….

Once the bezel was in place, I pickled the piece, and then oxidised it in liver of sulfur. Did I mentioned, by the way, that I just love that stuff? I works so fast!

Moon tree pendant

… or twisting while suspended – I blame the background that decided being a nice, flat background is overrated, and got all… wavy….

Oh, and I didn’t mention it: the stone is a moonstone. I will have to retake some photos, and also I will probably add one in which someone is actually wearing that pendant – to show how it really behaves while worn.

Moon tree pendant

In a box!

The pendant is available in my etsy store.

And also, I just noticed today that I got my first feedback! Yay! Finally, a customer who bothered with letting me know what she thinks! Also, it would be nice if other people thought of doing it – at least I would know for sure their items arrived safely and they’re happy with them, but without feedback I can only assume that – because no one ever returned anything.

Here’s what she said:

“Beautiful! I love it and wear it all of the time. The craftsmanship is great. I look forward to buying from this artist again.”

After reading it I wore stupid grin for at least half an hour – it’s such a great feeling- knowing someone likes what you made 😀

Till the next time!

Oh, and have great this new year, everyone!